Read More

Salesforce Today

Learn Salesforce Free Here
Read More

Salesforce Today

Explore The world with Salesforce

Wednesday, August 28, 2019

Salesforce Workflow Automation

Workflow Rules are automated processes to send E-mails alerts, assign tasks, update fields on trigger criteria based requirements.
To create a new rule:
  1. Select the object to which the workflow rule applies.Workflow
  2. Work Flow

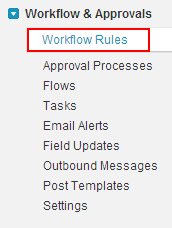
    • Setup -> Create -> Workflow & Approvals -> Workflow Rules.
    • Click on New Rule on Workflow rules.
    • Select object which you want this workflow rule to apply.
      Workflow
      Workflow

    2)   Clcik on ‘Next’.
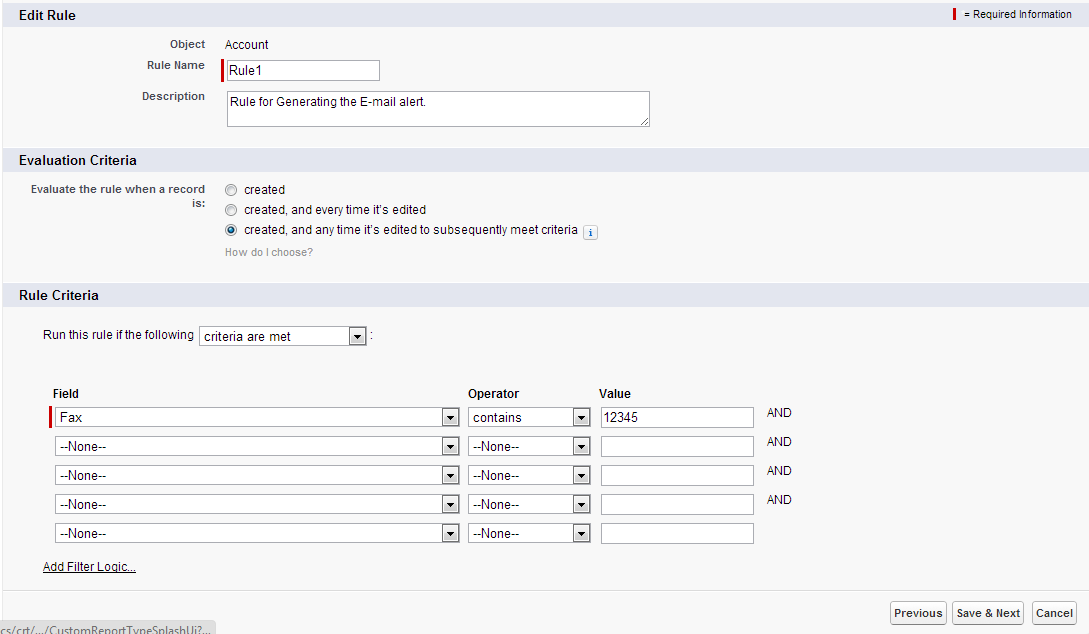
    • Enter a rule name.
    • Enter a description for the rule.
    • Set the evaluation criteria

          Created

    Evaluate the rule criteria each time a record is created. If the rule criteria is met, run the rule. Ignore all updates to existing records.With this option, the rule never runs more than once per record.

    Created, and every time it’s edited

    Evaluate the rule criteria each time a record is created or updated. If the rule criteria is met, run the rule. With this option, the rule repeatedly runs every time a record is edited, as long as the record meets the rule criteria.

    Created, and any time it’s edited to subsequently meet criteria

    Evaluate the rule criteria each time a record is created or updated.
    • For a new record, run the rule if the rule criteria is met.
    • For an updated record, run the rule only if the record is changed from not meeting the rule criteria to meeting the rule criteria.

    Enter your rule criteria

    Run this rule if the following according to the criteria based on requirements.
    • Criteria are met:  Select the filter criteria that a record must meet to trigger the rule.
    • Formula evaluates to true:      Enter a formula that returns a value of “True” or “False.” Salesforce triggers the rule if the formula returns “True.”
    3) Click on Save& Next.
    Workflow
    Workflow

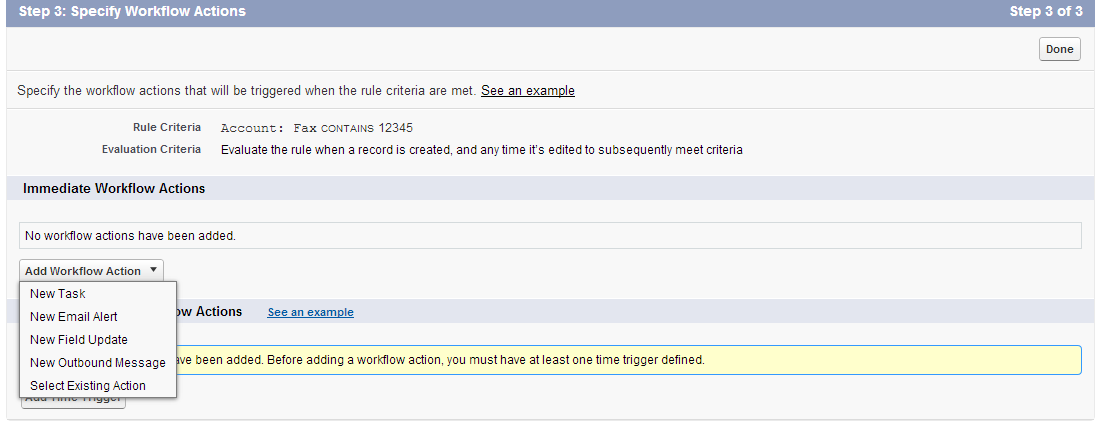
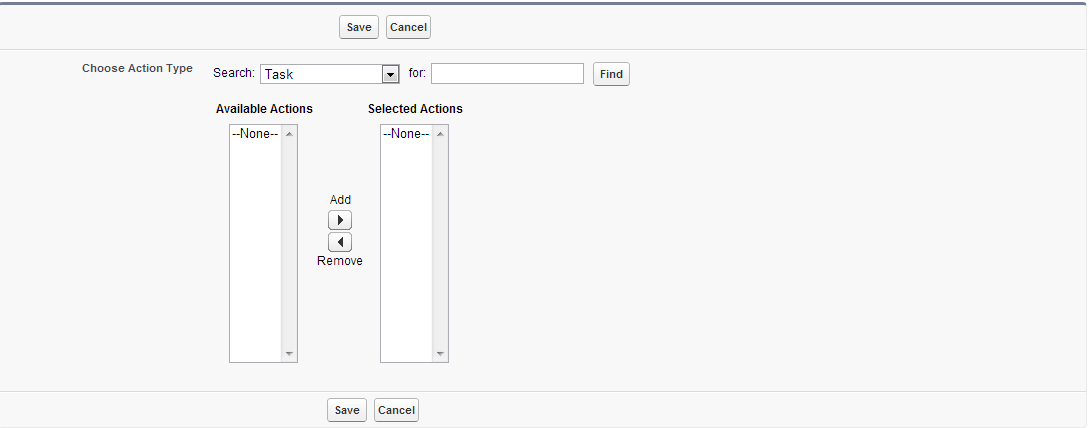
    Possible workflow Actions for immediate workflow action:

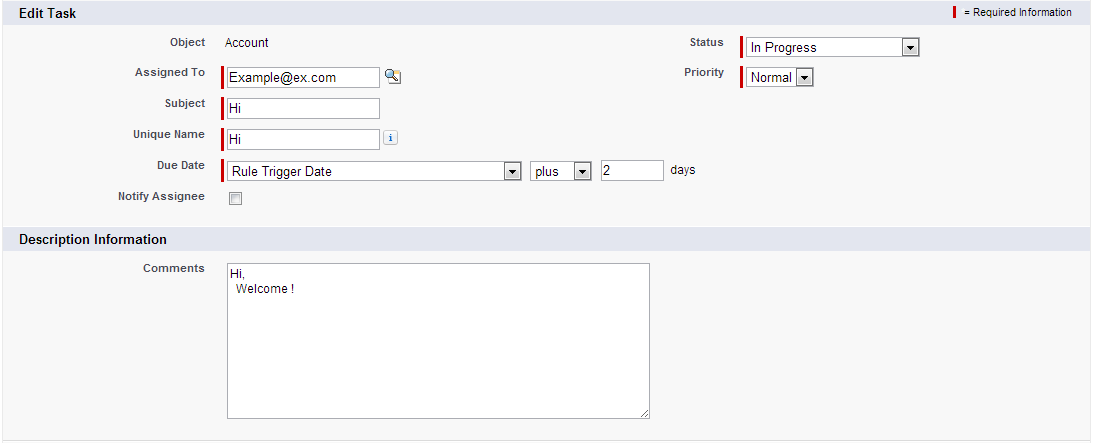
     New Task to create a task to associate with the rule

    Create a task to associate with one or more workflow rules, approval processes, or entitlement processes. When changing a task, any modifications will apply to all rules, approvals, or entitlement processes associated with it.
    Workflow
    Workflow

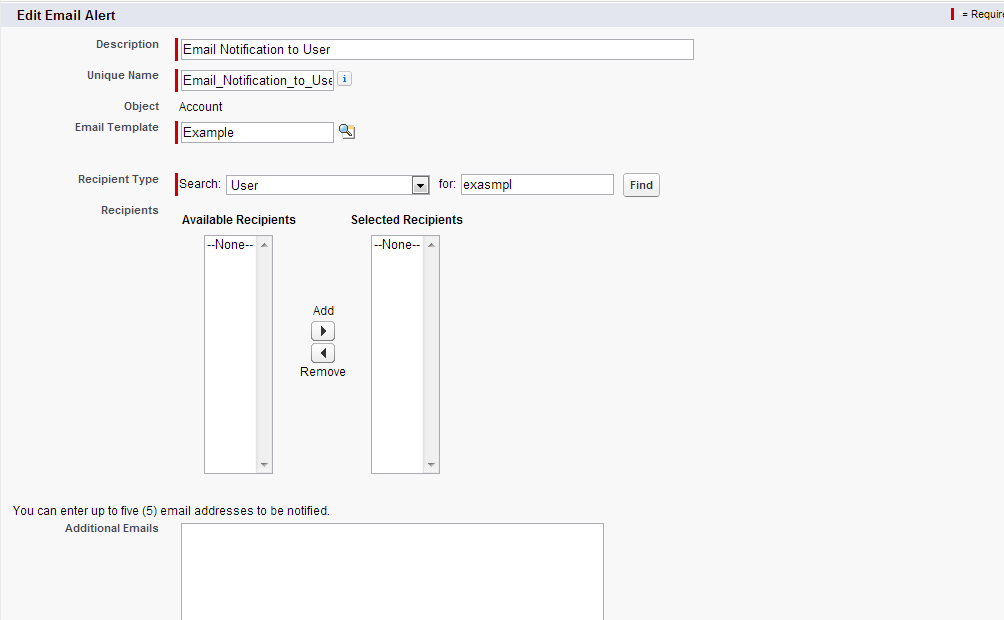
    New Email to create an email alert to associate with the rule

    Create an email alert to associate with one or more workflow rules, approval processes, or entitlement processes. When changing an email alert, any modifications will apply to all rules, approvals, or entitlement processes associated with it.
    Workflow
    Workflow

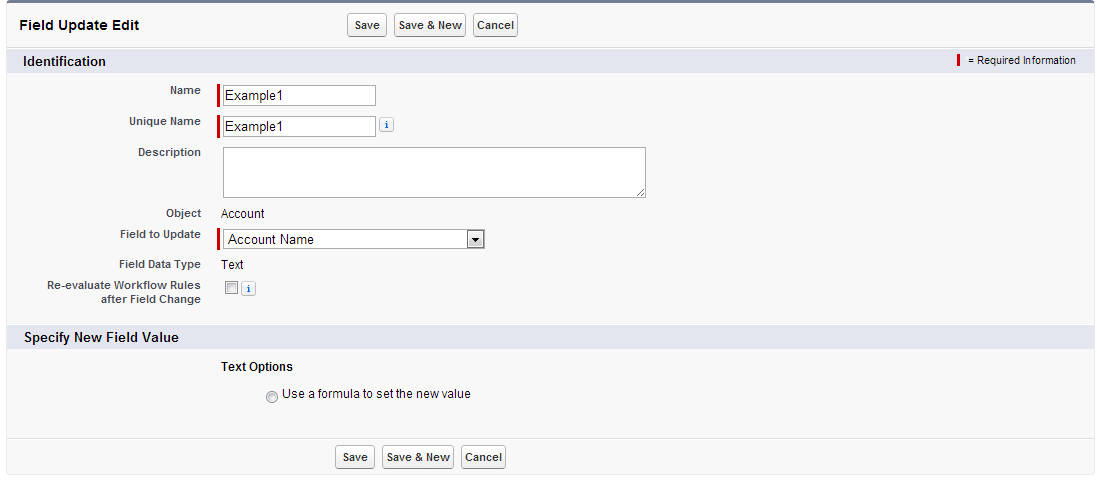
     New Field Update to define a field update to associate with the rule

    Define the field update, including the object associated with the workflow rule, approval process, or entitlement process, the field to update, and the value to apply. Note that the field to update may be on a related object. Fields are shown only for the type that you select.
    Workflow
    Workflow

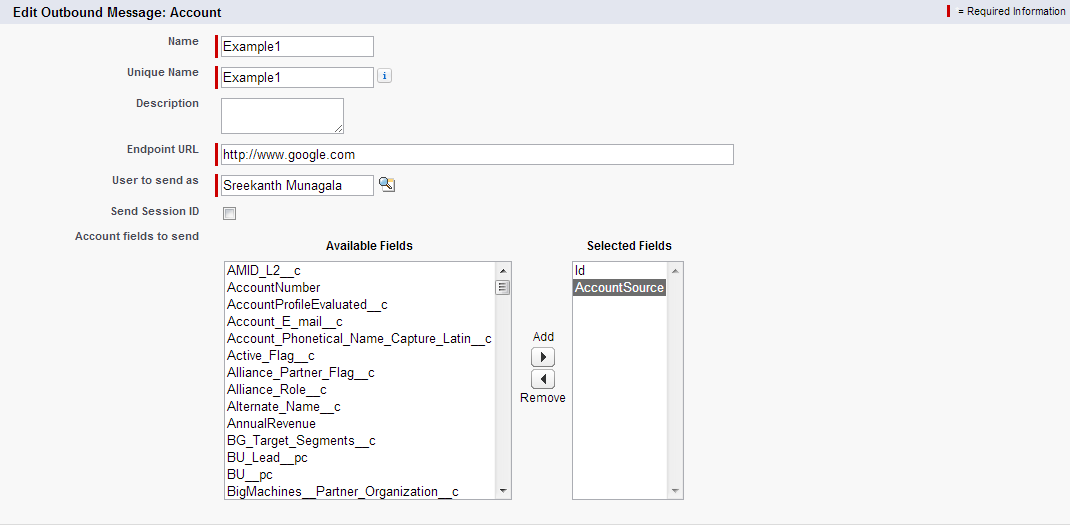
    New Outbound Message to define an outbound message to associate with the rule

    Enter the details of your outbound message and select the fields you want included in this message. Note that the fields available depend on the type of record previously selected.
    Workflow
    Workflow

    Select Existing Action to select an existing action to associate with the rule

    Workflow
    Workflow

     For Time-Dependent Workflow Actions workflow action

         Click on Add Time Trigger

     Specify a number of days or hours before or after a date relevant to the record, such as the date the record was created or modified.
    Click on Save.
    Workflow
    Workflow
    4) Configure additional immediate or time-dependent actions.
    5) Click Done and Activate the workflow.
Read More

Salesforce workflow, salesforce workflow automation examples


Defi:Workflow Rules are automated processes to send E-mails alerts, assign tasks, update fields on trigger criteria based requirements.

Salesforce Workflow is a business logic that evaluates the records as they are created, updated in an object to apply automated process like Assigning Tasks, Emails, Field Update and outbound message sending. Basically these workflows are used to do automated process. Workflows are very critical to an organization because they give the ability to enforce key business process easily with out needing to write any code.


To create workflows in salesforce go toSetup=>Build=>Create=>Workflows&Approvals=>Workflow Rules.
salesforce workflow

Salesforce Workflow types

Generally in Salesforce workflows are of two types.
  • Immediate action Workflow : Immediate action Workflow triggers immediate action when criteria is met.
  • Time Dependent action Workflow :Time Dependent action workflow triggers the action like sending automated E-mails, field update, Task assignment and sending outbound Messages depending on the time set.

Steps to be considered Before Creating Workflows in Salesforce.

1. Choose the Object on which you want to create Workflow.
2. Evaluation Criteria :- In Evaluation Criteria we are having three options in which we have to select any one of then they are.
  • Created : It happens only once
  • Created, and every time it’s edited :- It happens every time when a record is edited.
  • Created, and any time it’s edited to subsequently meet criteria : It fires action one time when we edited record and saved.
3. Rule Criteria : In Rule Criteria we define some rule to run when the criteria is met.Here we have two options.
  • Criteria are met.
  • Formula evaluates to True.
4. Workflow Action : Selection of actions like Immediate actions or Time Based Action.
  • Immediate Workflow : In Immediate Workflow we have the actions to be performed New Task, New Email Alert, New Field Update, New outbound Message, Select existing action.
  • Time-Dependent Workflow Action : Here we add Time Trigger where we mention Date that the action to be triggered.
Read More

Salesforce approval process

Salesforce approval process is an automated process and your organization can use to approve records in Salesforce, An approval process is combination of steps for a record to be approved and person has to approve it each step.A step can apply to all the records to that object or just record that meets the certain criteria. An approval process also specifies the actions to take when a record is approved, rejected, recalled, or first submitted for approval.
Simple or multi-step approval processes to automate and enforce the approval of virtually anything in your company.
  • Navigate setup -> Create -> Workflow & Approvals -> Approval Processes.
  • Select Object for the new approval process.
  • Click on  Create New Approval Process and choose Use Standard Setup Wizard from the drop-down button.
Note:  If you want to create a basic approval process with default settings. Click on Use Jump Start Wizard.

Salesforce approval process Example

Salesforce approval process
1)     Enter name, Unique name and Description(Optional).
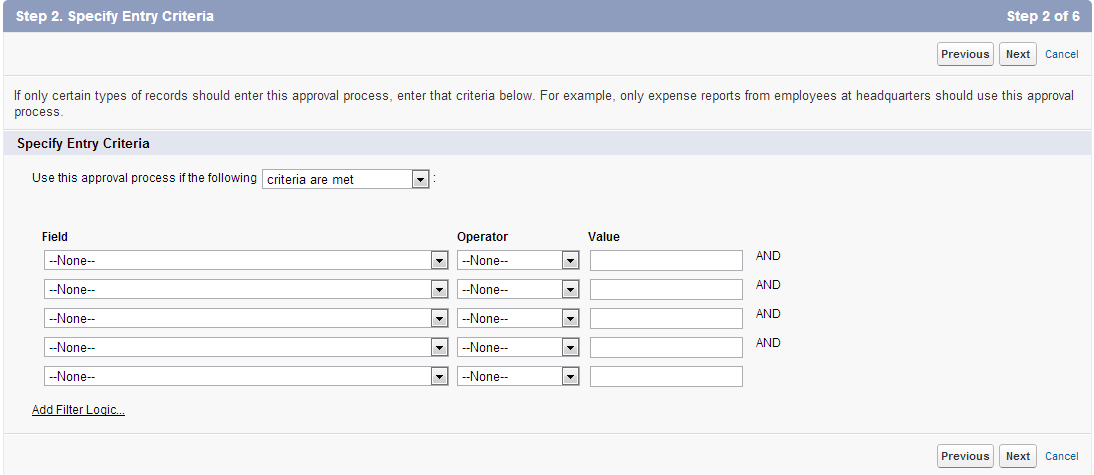
2)     Select criteria are met if you want to set a filter criteria that a record must meet to enter this approval process. For example, if only employees from headquarters should use this approval process to submit expense reports, enter the following filter criteria: “Current User: Office Location Equals Headquarters.”
Enter filter criteria for records that you want to be included in this approval process. Leave the filter blank if you want all records submitted to be included in the approval process.
Salesforce approval process
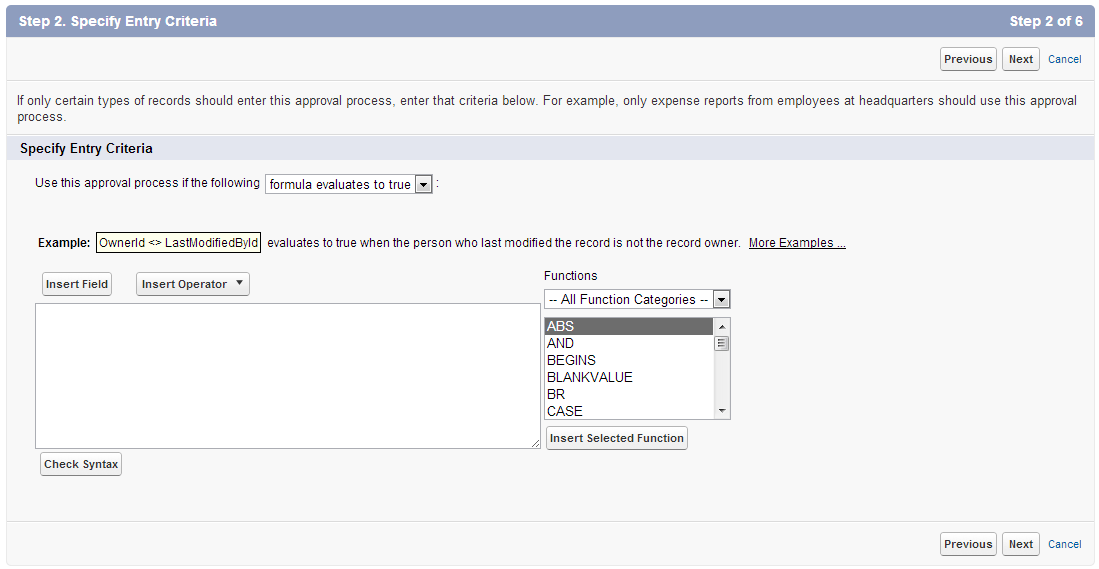
Select formula evaluates to true if you want a formula to determine what records enter the approval process.
Salesforce approval process
3)     When you define approval steps, you can assign approval requests to different users. One of your options is to use a user field to automatically route these requests. If you want to use this option for any of your approval steps, select a field from the pick list below. Also, when a record is in the approval process, it will always be locked– only an administrator will be able to edit it. However, you may choose to also allow the currently assigned approver to edit the record.
4)     Define initial submission actions
New field update / email / task -> Conditions -> save.
5)     Define approval steps
Manager step -> click on new approval step button -> provide the name -> all record should enter this step -> select approver manually and save.
  1. Manager step -> click on new approval step button -> provide the name -> all record should enter this step -> select approver manually and save.
  2. CEO step -> click on new approver step button -> provide the name -> enter criteria and save.
6)     Final approval steps
New field update / Task / Email according  to the field provide the condition and save .
7)     Final Rejection actions
New field -> provide the conditions and save.
  • Once the salesforce approval process is activated no more steps can be added.
Initial submission default actions cannot be edited but final approval & rejection default actions can be edited.
Read More

Saturday, August 10, 2019

Using Formula Fields

Many times we need to manipulate the values of the fields stored in the Salesforce object by applying a few conditions or calculations. For example, we need to get the Account number value linked to the contact object, so that we can find the Account number from the contact name. In such scenarios, we create formula field in addition to the existing fields in the object.
Let us now see the steps to create formula field.

Step 1

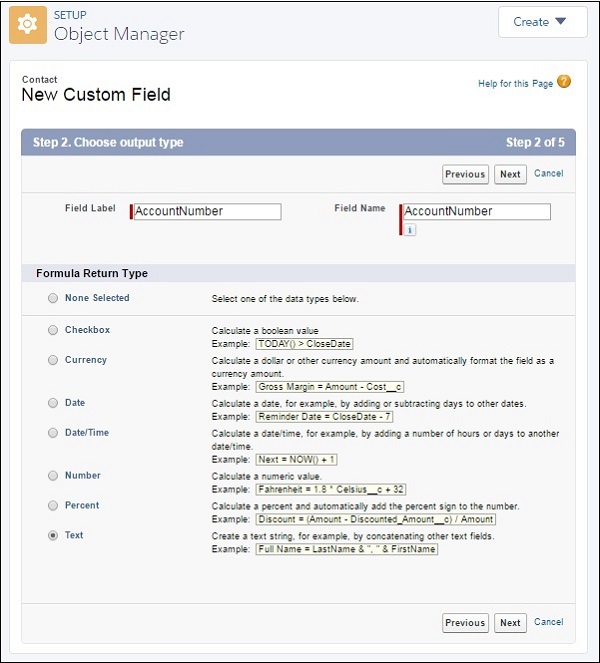
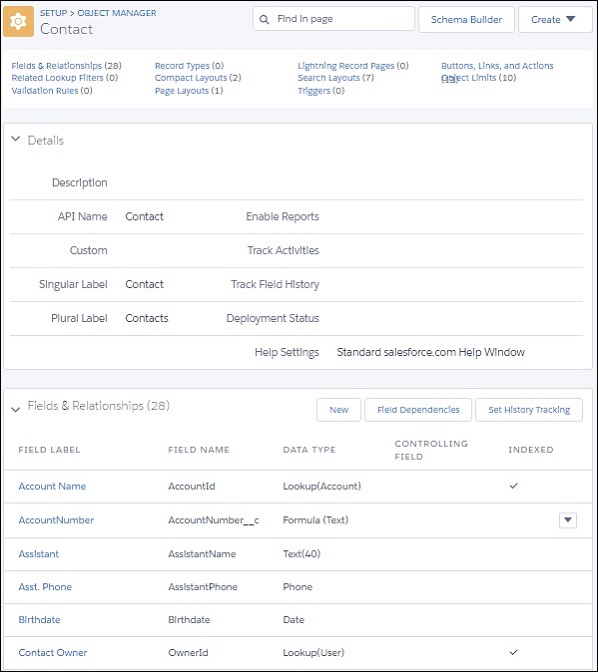
Go to the link path Setup Home → Object Manager → Contact. Then scroll down to the Fields and Relations tab and add New. Choose Formula as the data type and click Next. The following window appears. Here we choose the return type as Text and also fill in the Field Name and Field Label.
Formula Field 3

Step 2

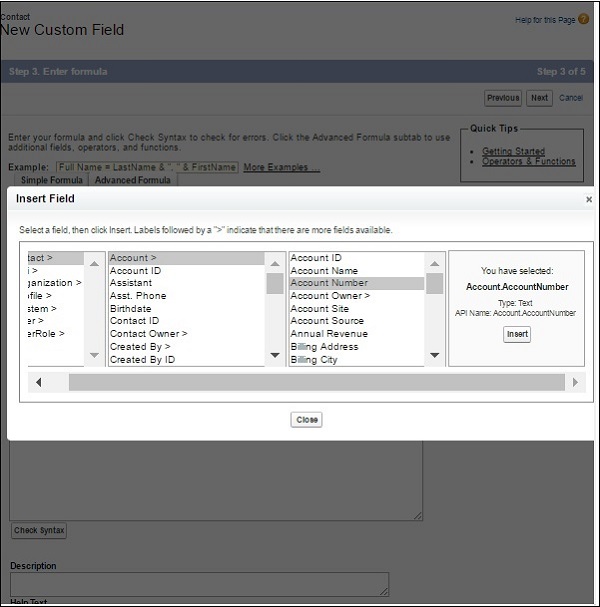
Clicking on Next brings takes you to the next window wherein, you have to select the field based on which the formula will be built. Let us now choose Account number from the Account table. Click Insert to insert this field into the Contact object.
Formula Field 4

Step 3

In this step, we can see the field Account Number appear under the fields of the Contact object as shown below.
Formula Field 5

Read More

Friday, August 9, 2019

Validation rules in salesforce

What is a Validation Rule?

Validation rules in Salesforce are the rules which contains a formula expressions that validates our data and returns a value of “True” or “False.
  • Validation rule contain Formula expressions.
  • It evaluate the data entered by the user.
  • Validation Rule displays error message to user when the enter invalid values.
  • We can create Validation rules in Salesforce for Objects, fields, campaign members etc.
Examples of validation Rules.
  1. Quantity cannot be Negative.
  2. A field to hold only certain values.
  3. Zip code, phone number to entered in certain format.
Let us check with out applying a Validation Rules to Quantity field in Sample Object.
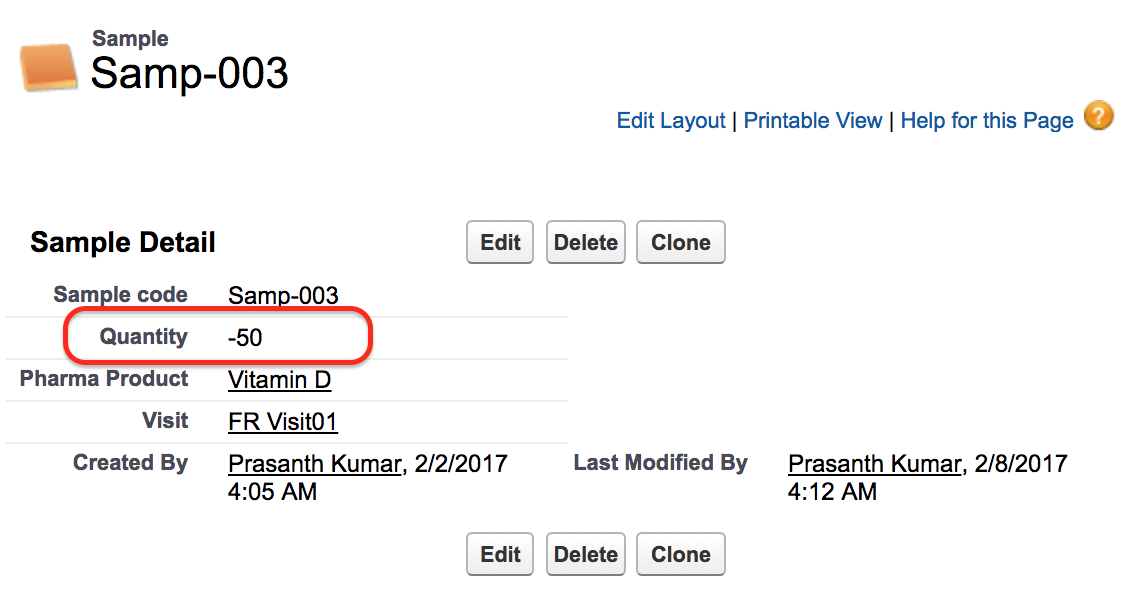
In Sample object we have a field called Quantity. Let us create a record in Samples and enter the quantity value as negative.
Validation rules in Salesforce
As shown above the quantity field is -5o. In general the quantity field must not be negative. In this case we have to apply validation rules. When ever a user enters negative value for a field Quantity then a error message must be displayed to Enter a positive value. Here we have to restrict user by entering negative value.

How to create Validation rules in salesforce?

To create validation rules in salesforce go to Setup | Build | Create | Objects | Sample | Validation Rules.
Validation rules in salesforce
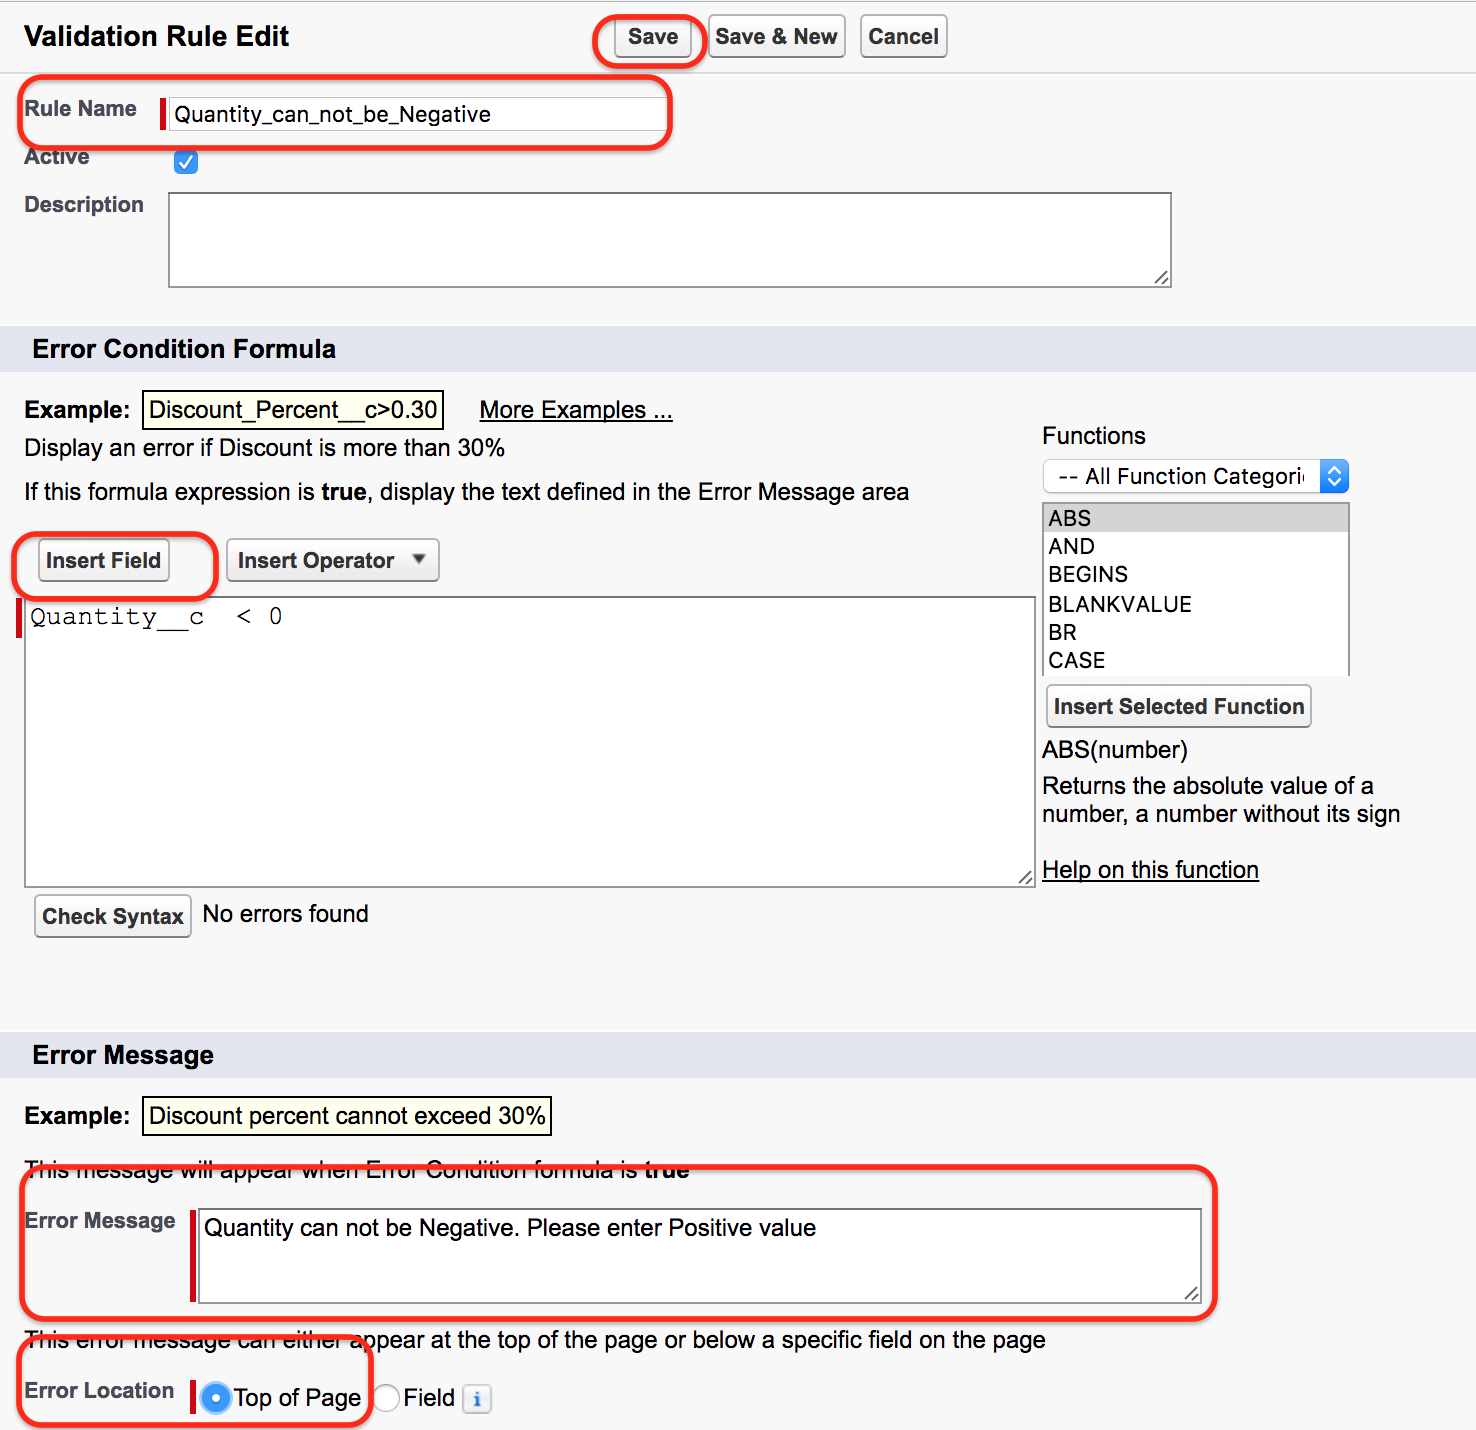
  • Click on new Button to create new validation rule in Sample object.
Validation rules in salesforce
  • Enter Rule Name.
  • Click on Insert field and enter the syntax.
  • Check Syntax whether it has any errors or not.
  • Enter Error message.
  • Enter Error location.
  • Now click on Save button.
Validation rules in Salesforce.com
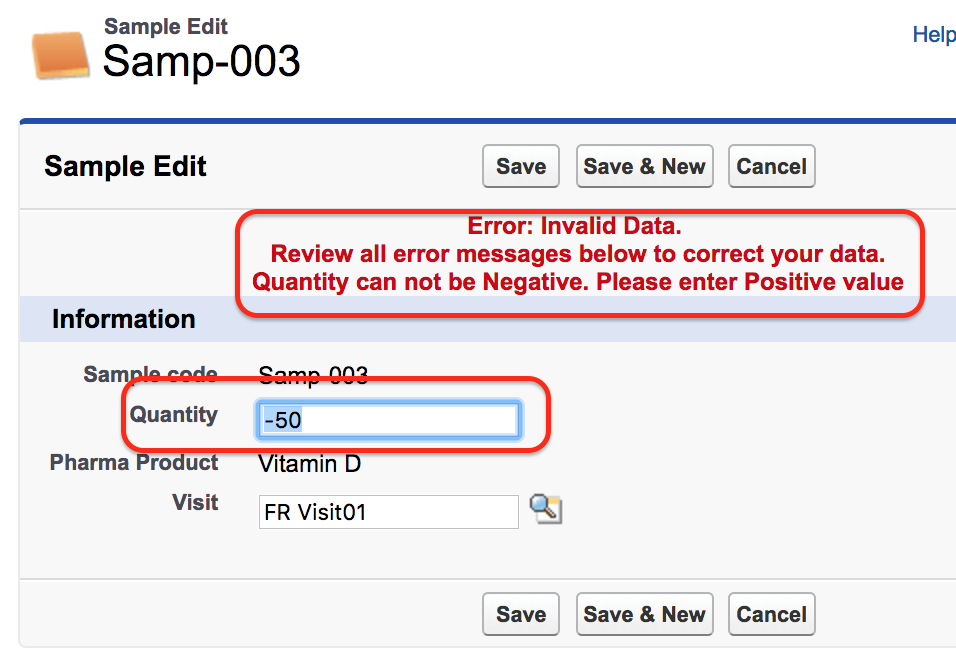
After creating Validation rule in Salesforce we can not enter negative value for Quantity. If we enter negative value an error message will be displayed at the top of the page as shown above. The record will only get saved when a quantity field is positive value.

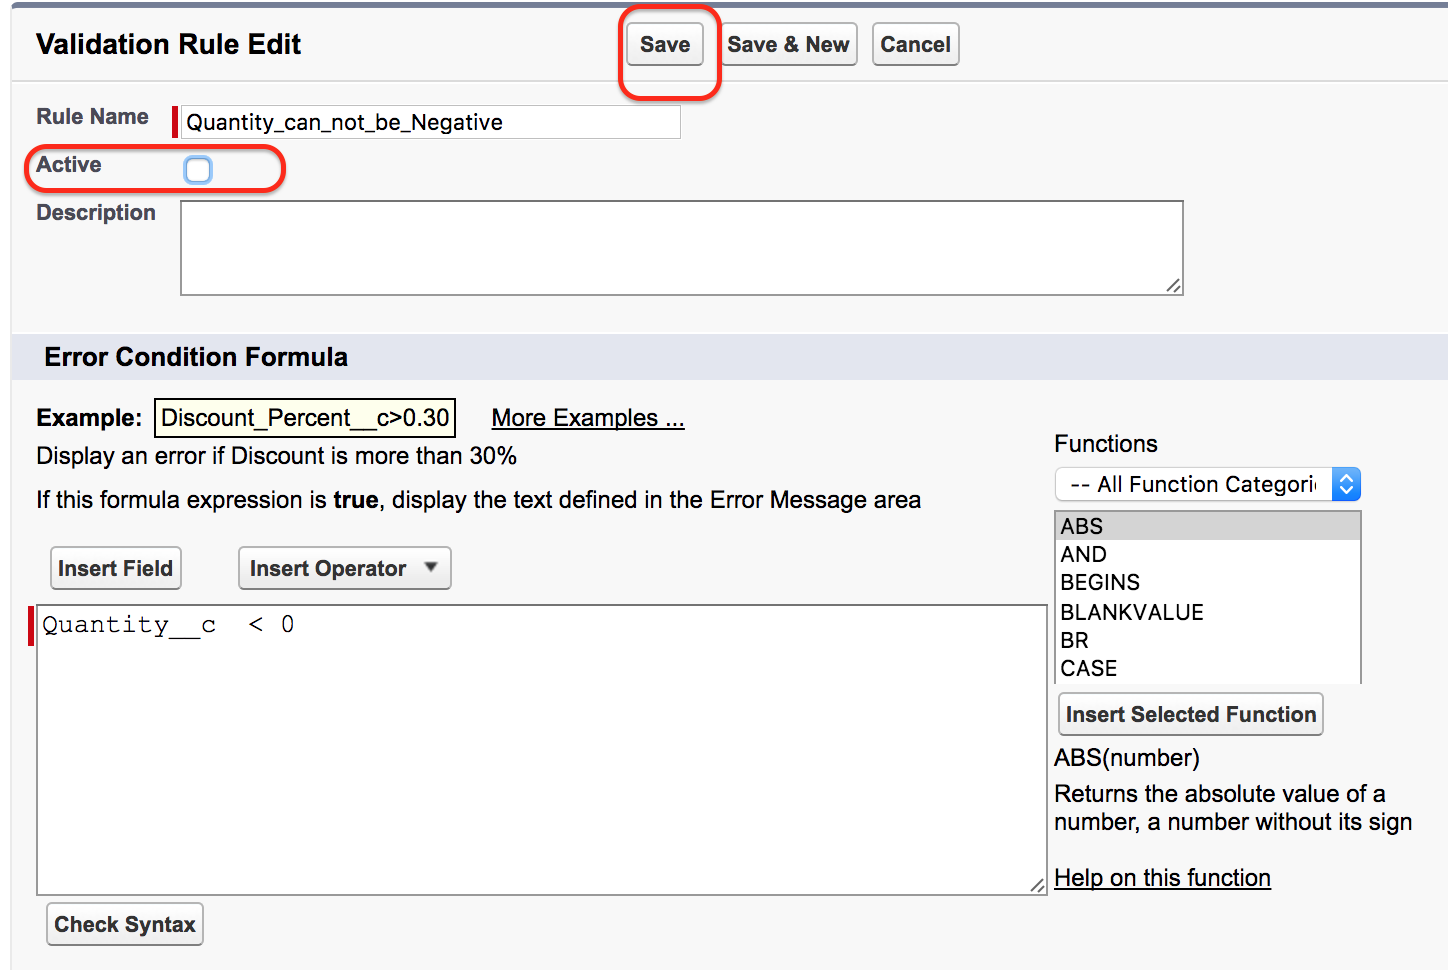
How to Activate / Inactivate a validation Rule?

A validation rule in Salesforce can be activated or Inactivated. To de activate Salesforce validation rules follow the steps given below.
Go to Object | Validation Rule | Edit the Validation Rule.
Salesforce Validation rules1
  • Click on Edit Button.
Salesforce Validation rules
  • Uncheck the active Button to deactivate Validation rule in Salesforce
  • Finally click on Save button.
Read More

Social Profiles

Twitter Facebook Google Plus LinkedIn RSS Feed Email Pinterest

Traffic

Popular Posts

Powered by Blogger.

BTemplates.com

Blogroll

Copyright © Salesforce | Powered by Blogger
Design by Lizard Themes | Blogger Theme by Lasantha - PremiumBloggerTemplates.com

Welcome To Salesforce Tutorial